SEND
Enjoy iFax services at 50% off!
Your discount will be applied during checkout.
Investigate the charges that you see on your bank, credit card, debit card, or mobile billing statement.
Google in-app purchase: https://support.google.com/googleplay/answer/2479637
Windows in-app purchase: https://support.microsoft.com/en-us/account-billing/returning-items-you-bought-from-microsoft-store-for-exchange-or-refund-81629012-aa4f-f48b-2394-8596f415072b
Contact iFax Support to close your account or to delete your application data: https://www.ifaxapp.com/support
iFax is the most secure way to transmit documents online or through a mobile app. As privacy and security are of paramount importance, iFax uses military-grade 258-bit AES encryption for every fax sent and received. iFax is in full compliance of HIPAA and GLBA regulations.
iFax offers three plans: Free, Plus, and Professional. For more information about these plans, visit https://www.ifaxapp.com/pricing/
When creating fax, ensure that fonts are clear and dark and that the background is white. If you are photographing a document, make sure to properly focus the camera so that the text is crisp. Taking a photo in a bright room will help to achieve optimal clarity. Only fax text documents, not photos or pictures.
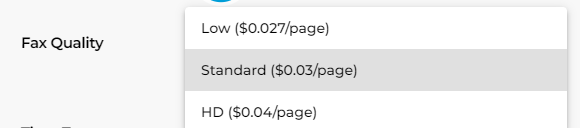
You can also select "HD" in the fax settings for the highest quality fax we can deliver image wise.
Please follow these steps for sending a fax:
Note: You will need credits or an outbound subscription to send faxes.
Please follow the below steps:
iOS: Settings -> Log in/ Register.
macOS: Click on the iFax icon at the top-left corner of the task-bar -> Preferences -> Account -> Login/Register
Android: Menu -> Login/SignUp
Windows: Settings -> IfaxID -> SignIn/SignUp
Web App: iFax Web -> Click on the profile icon -> Enter email address to Login/SignUp
Please note that if you are not logged in while making the purchase, your purchase is linked to the device used. You will then just need to Log in/Register to your account on the same device to assign your purchase to your account.
Currently, we do not provide an option to modify a fax number.
You will not need an incoming fax number subscription to send faxes. You will only need credits to send your fax.
You can delete a draft through below steps depending upon the application you are using:
iOS:
Swipe to left on the draft that you wish to delete and you will receive the option to delete the draft.
macOS:
Right-click on the draft that you wish to delete to receive the option to delete the draft.
Android:
To delete a draft, long-press on the draft and you will receive the option to delete it.
Windows:
Right-click on the draft that you wish to delete to receive the option to delete the draft.
You can send a fax without the cover page.
Just click on the edit icon at the top right corner of the cover page and selecting "Remove".
You will need to change the notification settings to receive your faxes as an attachment with your email.
Please make sure that you are logged in to the application. You can change notification settings by following steps:
iOS: Open Application -> Settings -> Notification settings -> Here you will get the option to change notifications.
macOS: Open Application -> Click on the ifax logo at the top left corner -> Preferences -> General -> Notification -> Reset the notification to receive the additional options.
Android: Open application -> Open Menu -> Notifications -> Select the toggle button for Attach Fax to Email as ON to receive your faxes as an email attachment.
Windows: Open Application -> Settings -> Notification -> Here you will get the option to change notifications.
Just click on the fax and tap on the edit button. You will be able to edit and resend the fax.
You'll need to get a fax number and share your fax number with your contacts to receive a fax. You will get a fax push and email notification for each new fax. You can view faxes anytime from iFax.
You will be able to see a delivered stamp below your fax once the fax is delivered successfully. You will also receive a push notification and an optional email upon successful delivery.
Failed delivery of faxes can be caused by either of two reasons: the recipient's number is unallocated/invalid, or the recipient line is busy.
You may whitelist the following IP addresses:
Yes, you can. To do so, simply follow the instructions below:
You can cancel your subscription with the specific payment platform:
It simply means transferring your existing telephone or fax number from one service provider to another.
We can port most Toll-Free, wireless, landline, and fax numbers in the United States and Canada.
Porting will take 7-10 business days. We’ll keep you updated throughout the porting process and will let you know once we have an approved FOC (Firm Order Commitment) with your current carrier.
The information needed to port your number will be collected during order creation. That information includes:
Note: Make sure the information you submit matches the information your current provider has on file. Any discrepancies can delay the number porting process.
Keep your account active with your current provider throughout the number porting process, as disconnected numbers cannot be ported. You will be notified by iFax once your number has successfully transferred and can cancel your service with your current provider at that time. iFax does not cancel your service on your behalf.
No. iFax does not cancel your previous service. You will need to cancel your previous service after your number has been transferred.
Yes, your existing service will work during the porting process as long as you do not make any account changes.
Yes! You may start the transfer of as many numbers as you wish from within your account.
Once you have completed your port submission online, you will be able to see the status of your request in the Porting tab under Fax Numbers.
The order status is set to exception and a Porting Specialist will reach out to you to inform you of the rejection reason and provide you options on how to resolve the rejection.
iFax will send an email when the port date has been confirmed. You may also check the status of your port in the Porting tab under Fax Numbers.
We know that your number is critical to your business. iFax ports are set to activate at a specific time. When that time comes, the losing carrier deactivates the numbers, and our system immediately activates them to ensure they work right away.
In accordance with your carriers’ policies, porting is not available on weekends or holidays.
A Letter of Authorization is a form that iFax will utilize on your behalf to port your numbers from your current provider. When submitting a number porting request in your iFax dashboard, a digitally signed LOA will be generated.
The Number Porting Team can be reached via email at support@ifaxapp.com at Business Hours of operation: Monday through Friday (9 AM – 5 PM EST).
Contact your previous carrier to remove the ported number from their database or switches. If all is fine with the previous carrier, reach out to support@ifaxapp.com for further assistance.
Didn’t find an answer to your questions?
Check out our help center.
